 |
| vintage image of Santa in his Workshop http://cathyscrazybydesign.blogspot.com/ |
Saturday, December 25, 2010
Have A Merry Christmas Today
I'll be back later to show 4 results from my Christmas lessons at school. We had a lovely showing of artwork for our Advent - Christmas Program at school. There was just enough art to go once around the gym and in the hallway leading into the gym. The program went off flawlessly and so did the caroling program the next day. We sent off a dozen Nativity paintings to the Knight's of Columbus group for judging in a local contest. Hopefully we will have an entry that will move on to the state level this year.
Thursday, December 23, 2010
More on the Ornament Club
For some reason my picture of our Christmas tree with our ornament club creations didn't post in my last message.
Here is how our tree looks this year:

I am always on the lookout for more creative ideas for us to do next year and beyond and I have three more that I'd like to file away for the future.

I saw some very cute felt ornaments on Terri Wilhelm's blog called Terri's Notebook. A friend of hers had created a pair of skates for a Christmas exchange package. I was admiring them and wrote a comment about how cute they were. Terri was so nice to do a little research and provided me with this link to a great tutorial on how to make them including how to use a large paper clip for the blades of the skates. Thank you Terri!
 The other ornament I want to do for next year was shown on the Crafty Crow. It is a lovely red poinsettia made with coffee filters and paper tubes.
 German Woven Stars also known as Froebel or Moravian stars will be another craft for my future meetings of ornament club. I must practice them myself this year so I will be able to guide the kiddos when they try weaving them.
Here is how our tree looks this year:

I am always on the lookout for more creative ideas for us to do next year and beyond and I have three more that I'd like to file away for the future.

I saw some very cute felt ornaments on Terri Wilhelm's blog called Terri's Notebook. A friend of hers had created a pair of skates for a Christmas exchange package. I was admiring them and wrote a comment about how cute they were. Terri was so nice to do a little research and provided me with this link to a great tutorial on how to make them including how to use a large paper clip for the blades of the skates. Thank you Terri!


Monday, December 13, 2010
Ornament Club

Shown here are all the members of this year's ornament club and the 2 leaders, Kathy O'Connor and myself. We had a nice mix of children in grades 3 - 5. This year we were able to make 8 ornaments. We've been having regular meetings since just before Thanksgiving. Our last meeting was on Wednesday Dec. 8th, so the tree is really well decorated. I estimated that there are 180+ ornaments hanging already.
Here is a great ornament idea I am filing away for next year:
 |
| photo by Joanna Davis |
I just read a very wonderful idea for making a snowglobe like ornament on a different blog, so I am creating a link to it. This was written up by Joanna on her blog, We Heart Art. I wanted to bring it to the attention of my readers and create a reminder for myself to make them next year for our school's ornament club.
 |
| #8 Plaster Cast Ornament |
 |
| # 2 Reindeer by a Fence |
 |
| #3 SnowAngel |
 |
| #4 Pinwheel |
 |
| #5 Decoupage |
 |
| #1 Wooden Lightbulb |
 |
| #7 photo perfect hanger |
- wooden lightbulb: ric rac hanger, paint, wooden light bulb shape
- Reindeer w/Fence popcicle sticks, paint, trims, spoon shaped craft sticks
- SnowAngel: foam, accucut shape, buttons, thin twigs, thin white wire, crackle medium
- pinwheel: scrapbook paper, spray adhesive, jingle bell
- decoupage: wrapping paper, acrylic medium
- wishing spool: empty wooden spool, thin strip of paper
- Photo Perfect Hanger: school photo, sharpies, accucut shapes
- Plaster Cast ornament: acrylic paint and glitter glue
 |
| #6 Wishing Spool |

Sunday, December 12, 2010
Art Teacher Blog Directory
Here is a great opportunity to connect with other art teachers and the blogs they write. Visit the Vivid Layers blog to read more about it and join up with a link to your own blog.


Friday, December 10, 2010
Farewell to Fall

The fall season has come and gone so quickly this year. Our school usually has an autumn harvest concert and a Christmas program, but for a change we have decided to have an Advent program and it will be followed by a winter concert in January. It gives the students more time to prepare, but we have missed the fun pumpkin, scarecrow and football songs and artwork this year in the music room and art room. It was the band instructor that suggested this change.
 |
| White Luminary Pumpkin for School Display |
This is the white pumpkin we used at school while the 6th graders were sculpting the pumpkins. Having it allowed us to see the ridges in the surface. We attached 2 pinch pots with plenty of score marks and slip to mold them together. Dental floss string helped us get the pumpkin ridges started and then they finished sculpting them with pencil tips. It was a very successful project this year.
 |
| Glazed pumpkins ready to come out of the kiln |
 |
| Harvest Pumpkins in Moonlight |
 |
| Indian Corn (unfinished sample) |
 |
| unfinished scarecrow sample |
 |
| Leaves Everywhere by Peter R. gr 5 |
 |
| Raining Leaves by Carley M. gr 5 |

 |
| Ceramic Leaves by Ryanne S gr 5 |

Monday, November 1, 2010
Education Blog Award

I am very honored to accept this award for my "Gallery2404" art education blog.
It was given by a website called Teacher Salary Info. They have awarded many other excellent education blogs by regions of the United States. You will be able to click on them by state and then choose specific topics of education.
Thank you for finding my little piece of the Internet.
Monday, October 25, 2010
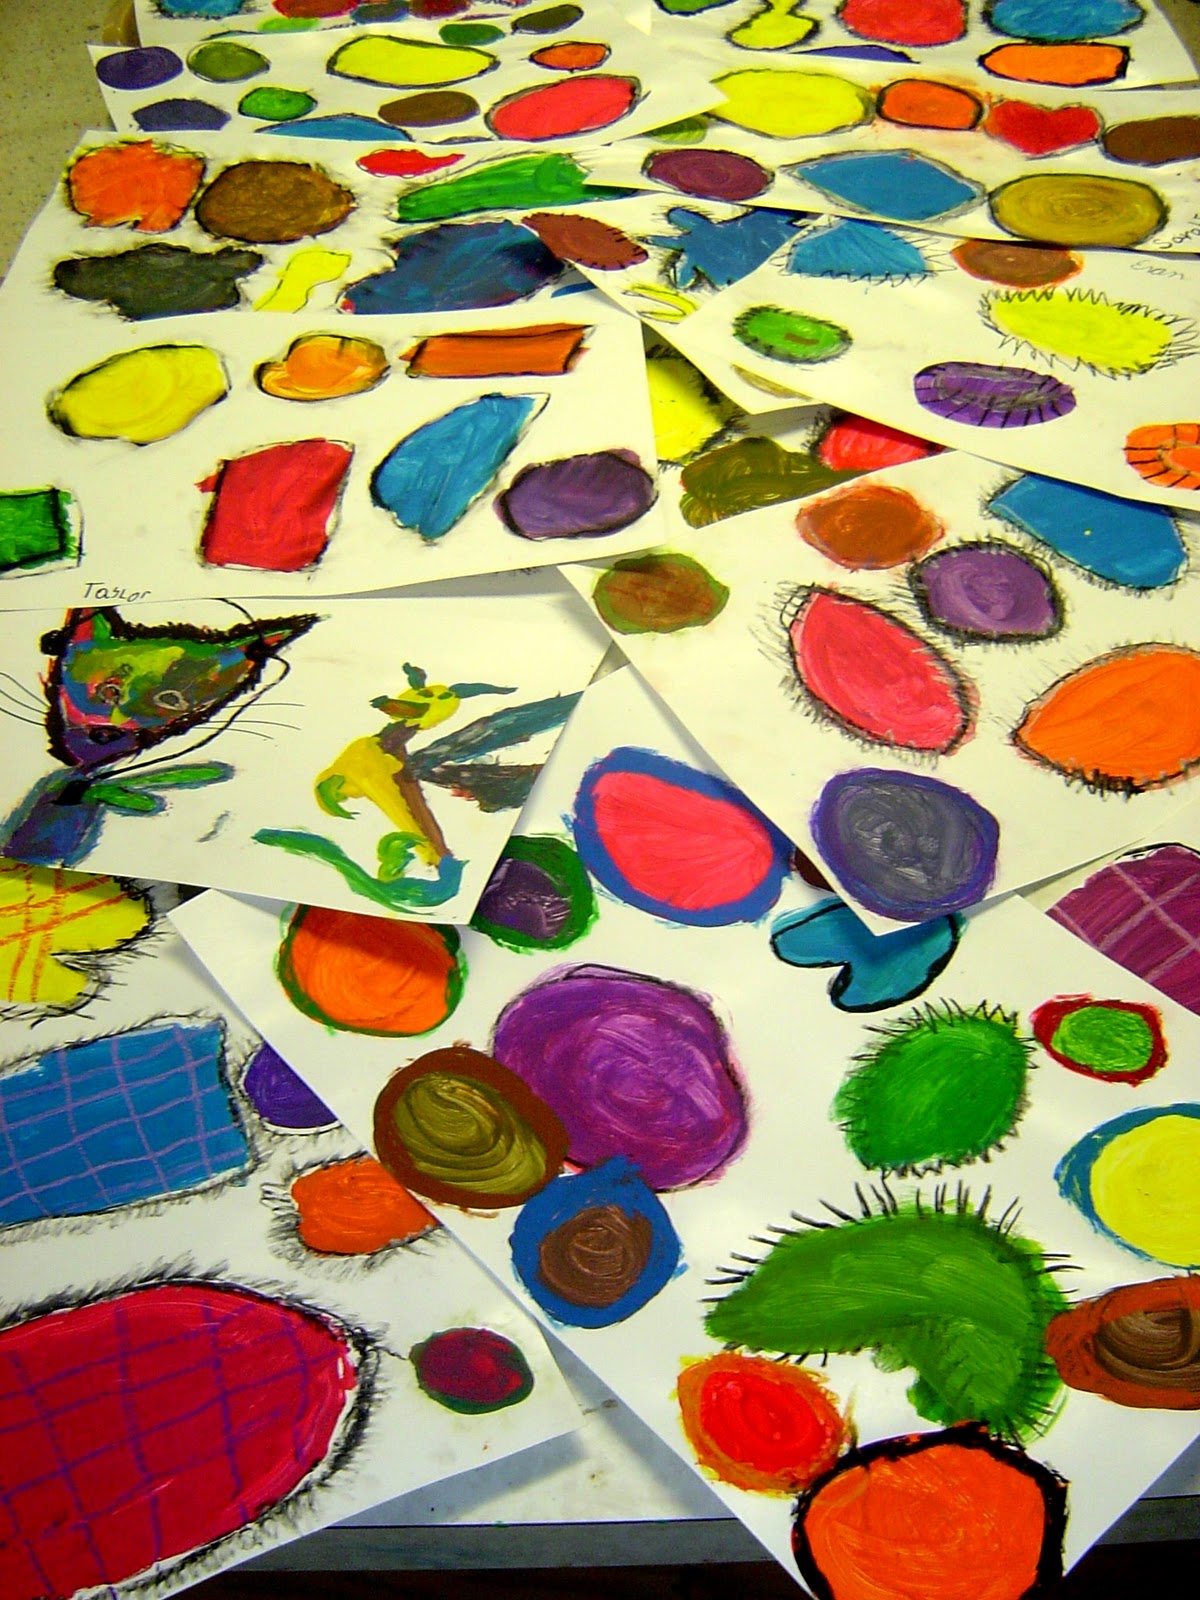
Artistic Color Mixing Sampler - Grade 3

To help us designate the shape without having to draw it, I showed my 2 classes that they may join 3 short wikki sticks (waxy covered wire sticks) and twist the shape closed.
Because we were working on a shiny cardstock, the wax stayed hooked to the page very well. They made 3 shapes this way and painted inside each one with a different primary color.
The next day we continued on by outlining the primary colors using 2 neutrals, a black and a white to mix a gray line around the edge of the color patches. Then I demonstrated the color mixing to make the secondary colors of orange, green, and violet. They could use the wikki sticks again for making the shapes.
They were able to make mixtures of any experimental colors in the available space. The only rule that I gave them were to not mix on top of the red, yellow, blue, green, orange, or violet shapes. They were free to create any color mixture recipes their heart's desired, just as long it was in a different spot than the already painted shapes.
 |
| Mixing palettes after 2 classes |
Another thing that helps the color mixing step to go smoothly is to encourage color mixing to take place on the newspaper. When they get a color they like, they can then go ahead and paint it on the project page.
Now that they are ino the final stages, they have really developed the shapes individually. Some made the shapes into recognizable images, others focused on making the color mixed spots into a pattern, while others made only a few large mixed blobby shapes. Each piece was quite unique. I even saw one boy that made his shapes look like aliens!
 |
| By Macauly gr 3 "Alien Color Mixing" |
The final day we got out the oil crayons again and I asked them to outline and bring out the edge of the secondary colors using black first then a touch of white. When those three were outlined just like the primary colors I told them to switch to only colored oil crayons and put lines around and over the colored mixing spots. They could outline them or add color on top of the spots to bring out the recipe for how the color was made.

one example with a lot of extra mixing spots!
One student suggested that these creative color mixes look like close ups of germs. Another student thought they looked like a view into a microscope. Another student drew oil crayon plaid lines over the top of her color mixing spots. It is quite a nice pattern. I responded with a comment that went something like this, "Isn't it nice that we can see different things in each artist's work?"
Tuesday, October 19, 2010
Link to the Versatile Blogger Award
If you are looking for more information about the Versatile Blogger award, please visit my other blog, CottageGardenQuilter.


Friday, October 15, 2010
4 Different Color Mixing Lessons
The children at my school used the color wheel to mix complementary colors for the neutral backgrounds of the self portraits. They have completed a color wheel worksheet with 12 steps of color. Each grade is moving on with a new project that is related to this color wheel.

In third grade we are making an artistic sampler of color mixes. Now that they are in the final stages, they have really developed individually. We all started the same way by making large closed shapes that were filled in with the primary color. We went on to paint the secondary shapes. After those 6 colors were designated, they were free to make any mixture they wanted and could make it into any shape they desired.

The fourth grade is making interactive color wheels. The top layer will be a triangle that moves to indicate a triad of color. It will be able to identify the primary colors as well as the secondary colors. The bottom layer will be just a bit larger and will have the full 12 steps of color, which will include the primary, secondary, as well as the 6 tertiary colors.
 |
| Example for gr 5 |
 |
| Example for gr 6 |
The fifth and the sixth graders are designing their own color study paintings. The 5th grade example will need a little work to bring in some of the tertiary mixes, but the layout is finished. Fifth graders will specifically paint using the primary and secondary colors and the tertiary colors. They may use sharpie or black oil crayon to define certain areas and shapes. Sixth graders will do the same; however, I am encouraging them to incorporate tints, shades, and tones of the primary and secondary colors. They will be encouraged to show color as well as form in their work.
Tuesday, October 5, 2010
Our Newest Painting on Canvas: A Patriotic Flag for Veteran's Day
Here is our latest collaborative project in which we are painting a flag image on a canvas.
Pictured beneath the easel is painting that was made in the year 2001. We worked on it following the tragic events of September 11th. We had painted the heart as a symbol for America and the doves in the lower corners were to remind of our school of the peace and healing that needed to occur for our country. It was exhibited once at the local gallery, The PumpHouse. We also showed the painting at a Veteran's Day Program just a couple of years ago. This year we hope to have the new flag done by the end of Ocober.
 |
| Our newest flag painting on the easel |
I set up the stripes by having a long strip of cardstock cut to the correct size to get 13 equal stripes on the flag. Students shaded along the edge of this strip with red and orange watercolor pencils. On the stripes outside edge it was shaded with blue and purple. It was blended into the white gesso with a damp cloth. They wiped in the direction of the stripe.
 |
| A group working on bringing out the 50 stars from the dark BLUE background. |
 |
| A different group working at bringing out the lettering on the prayer for veterans. |
 |
| an older painting entitled "America's Heart" |
Pictured beneath the easel is painting that was made in the year 2001. We worked on it following the tragic events of September 11th. We had painted the heart as a symbol for America and the doves in the lower corners were to remind of our school of the peace and healing that needed to occur for our country. It was exhibited once at the local gallery, The PumpHouse. We also showed the painting at a Veteran's Day Program just a couple of years ago. This year we hope to have the new flag done by the end of Ocober.
Celebrating Saint Faustina
More Thoughts on Kristina Nelson's Crayon Art
St. Faustina's feast day is celebrated today, on October 5th.
 |
| Crayon art by Kristina Nelson Entitled: The Mercy Prayer |
Most, but not all of my students are already Catholic and I think they would see the significance of this work. I know they would appreciate the beauty in it. I am not Catholic myself, but I am moved by this piece of art.
Fortunately she is offering this piece as a print, so I may order a copy from her very soon.
Fortunately she is offering this piece as a print, so I may order a copy from her very soon.
Friday, September 24, 2010
More Samples of Monochromatic Art
I wanted to share with you some samples of the
Monochromatic art pieces that all my students
created in the first weeks of school.
We have them framed on a simple colored background and put on display in the cafeteria and going up the steps in our main entrance of school.
 |
| by Emma gr 4 |
Monochromatic art pieces that all my students
created in the first weeks of school.
We have them framed on a simple colored background and put on display in the cafeteria and going up the steps in our main entrance of school.
 |
| by Libby Gr 4 |
 |
| by Mitchell gr 6 |
The monochromatic art pieces are now loaded on our school's page of the Artsonia website.
Click here if you'd like to view them. Once you are on our school page, there is also an option that you can set it to have the art cycle in a slide show by clicking on that option.
 |
| by Maeve gr 6 |
 |
| by Meg gr.3 |
 |
| by Claire gr. 4 |
 |
| by Rachel gr 6 |
 |
| by Ceci gr. 4 |
 |
| by Jade gr.6 |
 |
| by John gr. 6 |
Subscribe to:
Posts (Atom)